本文主要分析了冷流 和 热流 的相关实现原理,原理逻辑长而复杂。特别是涉及热流 SharedFlow 相关实现原理时,逻辑更是抽象,理解比较困难。本文比较长,建议根据目录选择分段阅读,可以先看基础概念和冷流,再分别看热流 SharedFlow 和 StateFlow 。
阅读本文时,可以带着以下问题去思考:
- 冷流和热流 指的是什么?
- 在业务开发中,冷流和热流可以用来做什么或者解决什么问题?
- 冷流和热流 的区别是什么?
- 冷流的执行原理是什么?
- 热流 SharedFlow 对它发射的数据是如何管理的?
- 热流 SharedFlow 对它的订阅者是如何管理的?
- 热流 StateFlow 和 LiveData 有什么区别?
技术都是为业务服务的,不管是冷流还是热流,它们都需要解决业务开发中实际的问题,比如:
- 协程和冷流可以替换
RxJava框架进行响应式编程,在Kotlin 项目中,使用协程和冷流比使用 RxJava 更有优势; - 热流 SharedFlow 可以用来做事件总线,替换
EventBus; - 热流 StateFlow 可以用来做事件状态更新,替换
LiveData,并结合MVI替换MVVM。
如果本文中出现错误,会及时矫正。欢迎阅读。
基础概念
从上一篇文章:Kotlin Flow 探索,知道 Kotlin Flow 就是 Kotlin 数据流,而数据流需要包含提供方(生产者),中介(中间操作),使用方(消费者):
- 提供方(生产者):源数据,将数据添加到数据流中;
- 中介(中间操作):可以修改发送到数据流的值,或修正数据流本身;
- 使用方(消费者):结果数据,使用数据流中的值。
flow
  .operator1()
  .operator2()
  .operator3()
  .collect(consumer)
创建一个数据流,可以使用 Kotlin 扩展函数 flowOf,asFlow , flow{}:
 flowOf(1, 2, 3).map { it * it }.collect {}

 (1..3).asFlow().map { it % 2 == 0 }.collect {}

 flow<Int> {
                emit(1)
                emit(2)
                emit(3)
            }.map { it * 2 }.collect {}
在上面创建数据流的方式中,必须要有使用方(消费者),也就是收集器 collect{}时,中间操作才会执行,这一点和 Kotlin Sequences 一样。
现在,除了上面的创建数据流方式,还可以使用 SharedFlow 和 StateFlow:
class TestFlow {
    private val _sharedFlow = MutableSharedFlow<Int>(
        replay = 0,
        extraBufferCapacity = 0,
        onBufferOverflow = BufferOverflow.SUSPEND
    )
    val sharedFlow: SharedFlow<Int> = _sharedFlow

    fun testSharedFlow() {
        MainScope().launch {
            Log.e("Flow", "sharedFlow:emit 1")
            _sharedFlow.emit(1)
            Log.e("Flow", "sharedFlow:emit 2")
            _sharedFlow.emit(2)
        }
    }

    private val _stateFlow = MutableStateFlow<Int>(value = 1)
    val stateFlow: SharedFlow<Int> = _stateFlow

    fun testStateFlow() {
        MainScope().launch {
            _stateFlow.value = 1
        }
    }
}
在使用SharedFlow 和 StateFlow时创建数据流时,可以没有或者有多个收集器 collect{} ,它独立于收集器 collect{}存在,并且不会被asList,asSet等消费者终止。
testFlow.testSharedFlow()

testFlow.testStateFlow()

控制台输出结果:
E  sharedFlow:emit 1
E  sharedFlow:emit 2
E  stateFlow:value 1
可以看到,没有收集器 collect{}的时候,ShareFlow 和 StateFlow 还是执行了。下面添加收集器 collect{},再看一下:
        lifecycleScope.launch {
            testFlow.sharedFlow.collect {
                Log.e("Flow", "SharedFlow Collect1: value=$it")
            }
        }
        lifecycleScope.launch {
            testFlow.sharedFlow.collect {
                Log.e("Flow", "SharedFlow Collect2: value=$it")
            }
        }
        testFlow.testSharedFlow()

        lifecycleScope.launch {
            testFlow.stateFlow.collect {
                Log.e("Flow", "StateFlow Collect1: value=$it")
            }
        }
        lifecycleScope.launch {
            testFlow.stateFlow.collect {
                Log.e("Flow", "StateFlow Collect2: value=$it")
            }
        }
        testFlow.testStateFlow()

控制台输出结果:
E  StateFlow Collect1: value=1
E  StateFlow Collect2: value=1

E  sharedFlow:emit 1
E  SharedFlow Collect1: value=1
E  SharedFlow Collect2: value=1
E  sharedFlow:emit 2
E  SharedFlow Collect1: value=2
E  SharedFlow Collect2: value=2
对于SharedFlow ,它类似事件总线,将事件分发给事件订阅者,共享事件。对于StateFlow ,它类似 LiveData,更新事件最新状态,告知订阅者事件的更新。
现在对于冷流和热流可以简单区分为:将使用 flowOf,asFlow , flow{}等创建的数据流称为冷流,也就是使用 : Flow<T>创建的数据流,它不能独立于收集器 collect{}存在,且每个数据流需要收集器 collect{}才能称为一个完整的数据流;将使用: SharedFlow<T> 或 : StateFlow<T> 创建的数据流称为热流,它能独立于收集器 collect{}存在,可以没有或多个收集器 collect{}。
冷流
Flow 是一种类似于序列的冷流 — 这段 flow 构建器中的代码直到流被收集的时候才运行。
Flow 和序列一样,需要有末端操作符,也就是有收集器 collect{} 或 asList,asSet等操作的时候,才运行:
        lifecycleScope.launch {
            val flow = flow {
                Log.e("Flow", "emit:1")
                emit(1)
                Log.e("Flow", "emit:2")
                emit(2)
            }.map {
                Log.e("Flow", "map:$it")
                it * it
            }
            flow.collect {
                Log.e("Flow", "collect:$it")
            }
        }
控制台输出结果:
E  emit:1
E  map:1
E  collect:1
E  emit:2
E  map:2
E  collect:4
当使用 collect{}时,开始执行数据生产:发射值 emit,再执行中间操作:map变换,再执行数据消费:collect。在整个过程中,数据流是按照时间顺序发生的,也就是emit:1 →map:1→collect:1,emit:2 →map:2→collect:4,而不是emit:1 →emit:2,map:1 →map:2,collect:1 →collect:4。
下面从一个示例来简单看下冷流的执行原理 :
class TestFlow {
    fun testColdFlow() {
        MainScope().launch {
            flow<Int> { emit(1) }.map { it * it }.collect {
                Log.e("Flow", "testColdFlow", Throwable())
            }
        }
    }
}
运行 testColdFlow 方法,控制台输出 collect 方法调用栈信息:
 E  testColdFlow

java.lang.Throwable
at com.wangjiang.example.flow.TestFlow$testColdFlow$1$3.emit(TestFlow.kt:46)
at com.wangjiang.example.flow.TestFlow$testColdFlow$1$3.emit(TestFlow.kt:45)
at com.wangjiang.example.flow.TestFlow$testColdFlow$1$invokeSuspend$$inlined$map$1$2.emit(Emitters.kt:224)
at kotlinx.coroutines.flow.internal.SafeCollectorKt$emitFun$1.invoke(SafeCollector.kt:15)
at kotlinx.coroutines.flow.internal.SafeCollectorKt$emitFun$1.invoke(SafeCollector.kt:15)
at kotlinx.coroutines.flow.internal.SafeCollector.emit(SafeCollector.kt:87)
at kotlinx.coroutines.flow.internal.SafeCollector.emit(SafeCollector.kt:66)
at com.wangjiang.example.flow.TestFlow$testColdFlow$1$1.invokeSuspend(TestFlow.kt:45)
at com.wangjiang.example.flow.TestFlow$testColdFlow$1$1.invoke(Unknown Source:14)
at com.wangjiang.example.flow.TestFlow$testColdFlow$1$1.invoke(Unknown Source:4)
at kotlinx.coroutines.flow.SafeFlow.collectSafely(Builders.kt:61)
at kotlinx.coroutines.flow.AbstractFlow.collect(Flow.kt:230)
at com.wangjiang.example.flow.TestFlow$testColdFlow$1$invokeSuspend$$inlined$map$1.collect(SafeCollector.common.kt:113)
at com.wangjiang.example.flow.TestFlow$testColdFlow$1.invokeSuspend(TestFlow.kt:45)
at kotlin.coroutines.jvm.internal.BaseContinuationImpl.resumeWith(ContinuationImpl.kt:33)
at kotlinx.coroutines.DispatchedTask.run(DispatchedTask.kt:106)
at android.os.Handler.handleCallback(Handler.java:900)
at android.os.Handler.dispatchMessage(Handler.java:103)
at android.os.Looper.loop(Looper.java:219)
at android.app.ActivityThread.main(ActivityThread.java:8668)
at java.lang.reflect.Method.invoke(Native Method)
at com.android.internal.os.RuntimeInit$MethodAndArgsCaller.run(RuntimeInit.java:513)
at com.android.internal.os.ZygoteInit.main(ZygoteInit.java:1109)
从上面方法调用栈信息,可以看出大致顺序是:collect→AbstractFlow.collect →SafeFlow.collectSafely →map →SafeCollector.emit →emit →TestFlow$testColdFlow$1$3.emit。(上面的日志和源码对应不上,这里可以通过 AndroidStudio 查看 kotlin 的 class 文件。)
这里重点来了解一下中间操作 map 变换:
import kotlinx.coroutines.flow.unsafeTransform as transform

public inline fun <T, R> Flow<T>.map(crossinline transform: suspend (value: T) -> R): Flow<R> = transform { value ->
    return@transform emit(transform(value))
}

internal inline fun <T, R> Flow<T>.unsafeTransform(
    @BuilderInference crossinline transform: suspend FlowCollector<R>.(value: T) -> Unit
): Flow<R> = unsafeFlow { // Note: unsafe flow is used here, because unsafeTransform is only for internal use
    collect { value ->
        // kludge, without it Unit will be returned and TCE won't kick in, KT-28938
        return@collect transform(value)
    }
}

internal inline fun <T> unsafeFlow(@BuilderInference crossinline block: suspend FlowCollector<T>.() -> Unit): Flow<T> {
    return object : Flow<T> {
        override suspend fun collect(collector: FlowCollector<T>) {
            collector.block()
        }
    }
}
从上面代码分析,map 流程是:map → transform → unsafeTransform → unsafeFlow { } → collect {} → 执行上一个 flow → 拿到上一个 flow 的结果 → @collect transform(value) → @transform emit(transform(value)) → map变换操作结果→ 到下一个 flow 或 消费者 collect。
看到这个流程,没错,flow 冷流的执行流程是与 Kotin Sequence 执行流程的原理是类似的。
所以整个冷流的触发流程是可以简单概括为:消费者 collect 触发 中间操作,中间操作 filter, map 变换等 触发生产者,然后生产者 emit 生产数据,然后将数据交给中间操作变换,最后再将变换后的数据交给消费者。这也就是冷流执行的原理。有点类似,从下往上触发,再从上往下流动的感觉。
业务场景
对于 : Flow<T> 的业务场景,与使用 RxJava 类似,用于响应式编程,例如:
 GlobalScope.launch(Dispatchers.Main) {
            flowOf(bitmap).map { bmp ->
                //在子线程中执行耗时操作,存储 bitmap 到本地
                saveBitmap(bmp)
            }.flowOn(Dispatchers.IO).collect { bitmapLocalPath ->
                //在主线程中处理存储 bitmap 后的本地路地址
            }
        }
在 Kotlin 项目中,可以使用 协程和冷流 替换 RxJava 来做响应式编程。
总结
冷流需要有数据生产者、0或多个中间操作、数据消费者才能一起构建成为一个完整的流。它的执行原理类似 Kotin Sequence,当有消费者 collect 或其它终端操作时,流开始从下往上触发,然后从上往下流动。
热流
热流分为 SharedFlow 和 StateFlow,它们都是独立于收集器的存在而存在。
SharedFlow
SharedFlow ,顾名思义,它被称作为热流,主要在于它能让所有收集器共享它所发出的值,其中共享的方式是广播,且它的实例可以独立于收集器的存在而存在。要理解 ShredFlow,就要明白它共享和独立存在的含义。
下面将从 SharedFlow 的创建,发摄 和 收集来分析。
创建
创建一个 SharedFlow 使用的是 SharedFlowKt 提供的 MutableSharedFlow 构造方法:
private val _sharedFlow = MutableSharedFlow<Int>(
        replay = 0,
        extraBufferCapacity = 0,
        onBufferOverflow = BufferOverflow.SUSPEND
    )
    val sharedFlow: SharedFlow<Int> = _sharedFlow
参数含义:
replay:新订阅者订阅时,重新发送多少个之前已发出的值给新订阅者(类似粘性数据);extraBufferCapacity:除了 replay 外,缓存的值数量,当缓存空间还有值时,emit 不会 suspend(emit 过快,collect 过慢,emit 的数据将被缓存起来);onBufferOverflow:指定缓存区中已存满要发送的数据项时的处理策略(缓存区大小由 replay 和 extraBufferCapacity 共同决定)。默认值为 BufferOverflow.SUSPEND,还可以是 BufferOverflow.DROP_LATEST 或 BufferOverflow.DROP_OLDEST(顾名思义)。
public fun <T> MutableSharedFlow(
    replay: Int = 0,
    extraBufferCapacity: Int = 0,
    onBufferOverflow: BufferOverflow = BufferOverflow.SUSPEND
): MutableSharedFlow<T> {
    //.....省略
    //缓存的值数量
    val bufferCapacity0 = replay + extraBufferCapacity
    val bufferCapacity = if (bufferCapacity0 < 0) Int.MAX_VALUE else bufferCapacity0
    return SharedFlowImpl(replay, bufferCapacity, onBufferOverflow)
}

internal open class SharedFlowImpl<T>(
    private val replay: Int,
    private val bufferCapacity: Int,
    private val onBufferOverflow: BufferOverflow
) : AbstractSharedFlow<SharedFlowSlot>(), MutableSharedFlow<T>, CancellableFlow<T>, FusibleFlow<T> {
    //.....省略
}
MutableSharedFlow 构造方法返回的是一个 SharedFlowImpl 实例,下面来看一下关于 SharedFlowImpl 类关联的类和接口的简单关系:
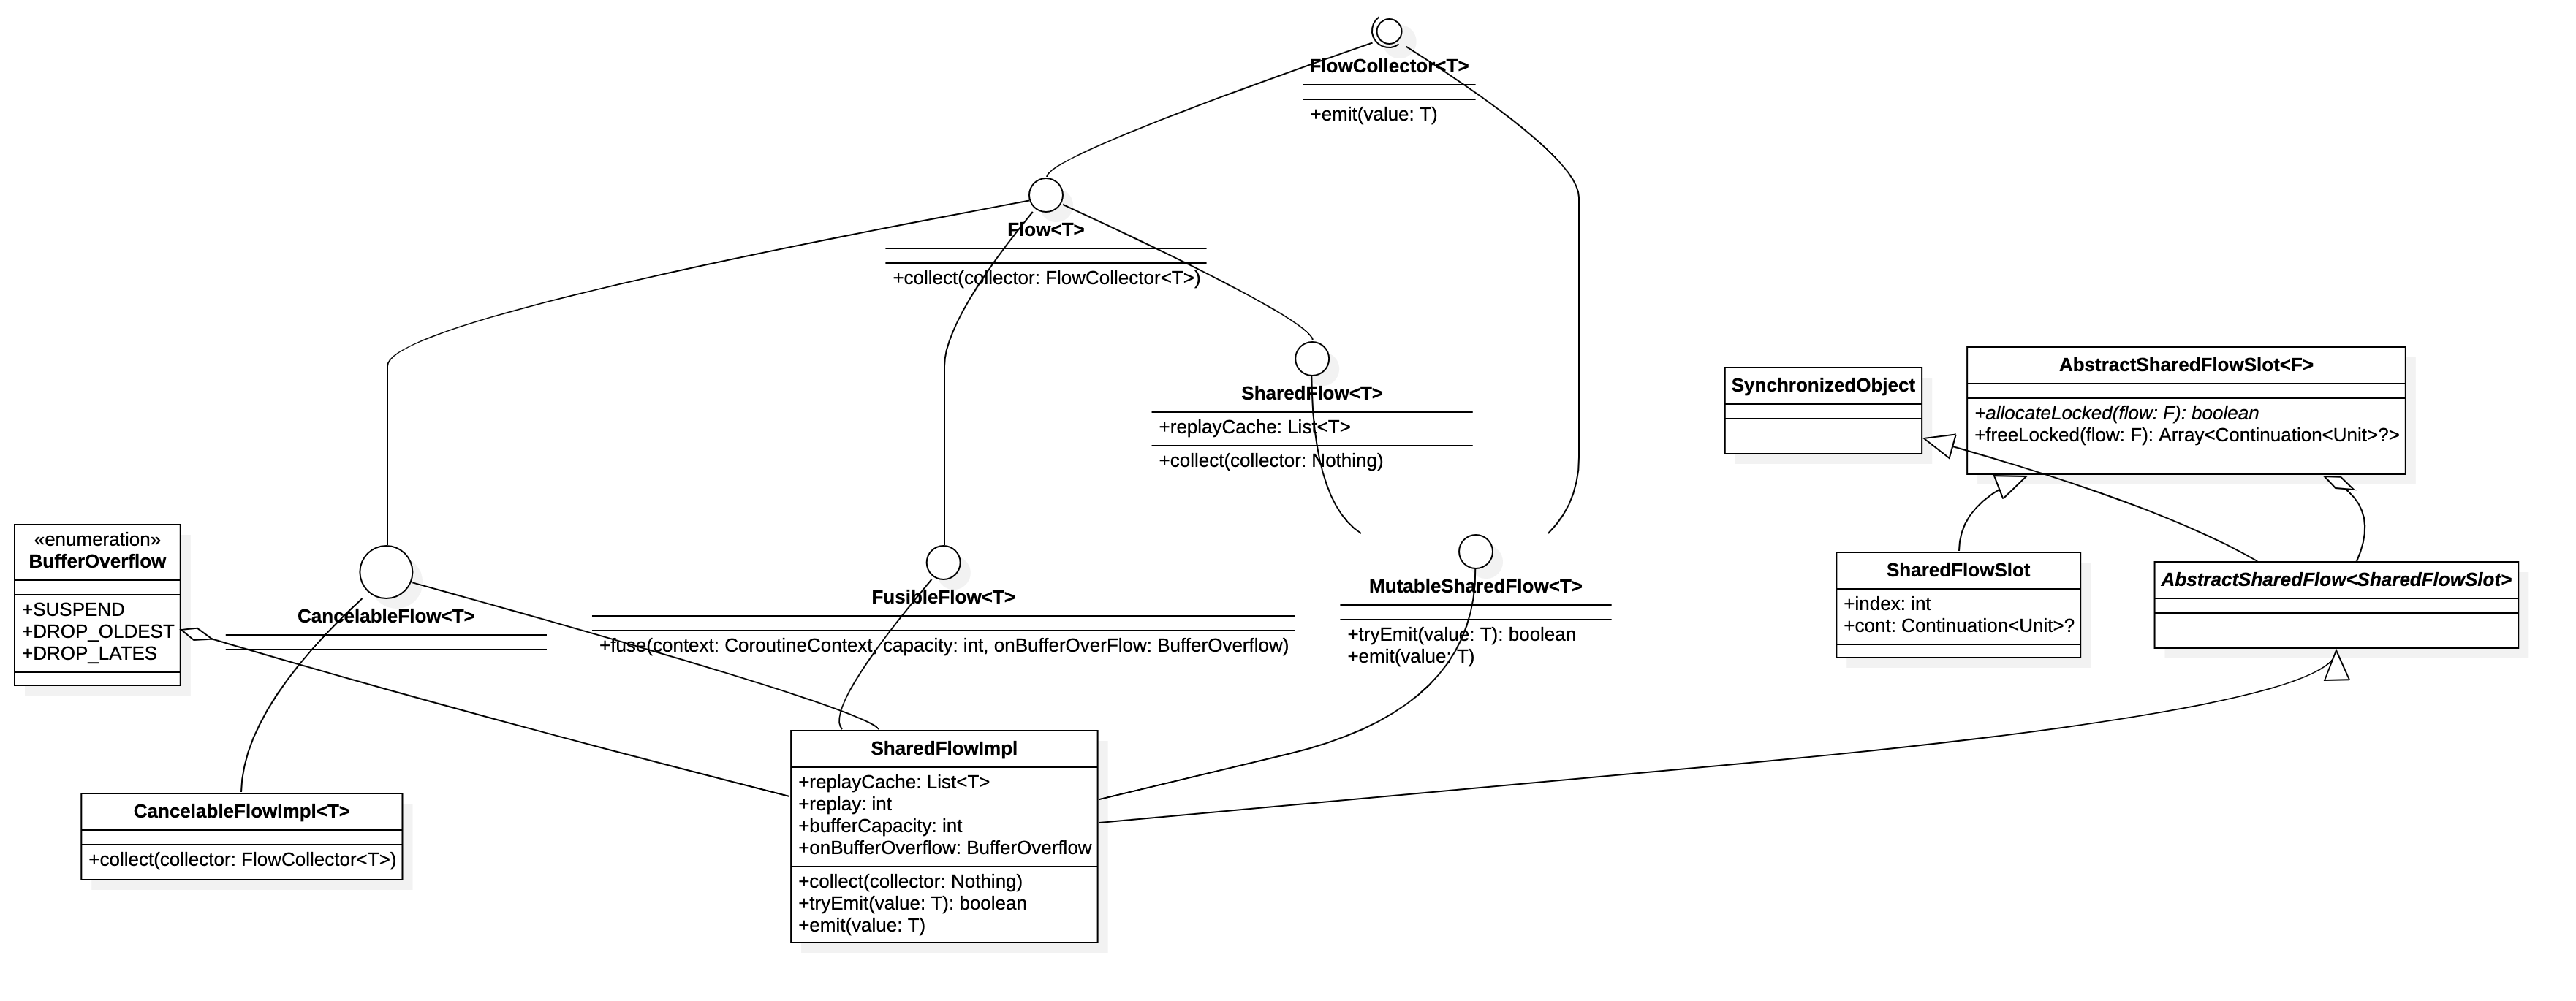
Flow 接口:用于流的消费操作,也就是订阅者订阅 collect,它提供public suspend fun collect(collector: FlowCollector<T>)接口方法,方法参数 collecter 就是冷流或热流的收集器,所以 Flow 接口依赖于 FlowCollecter 接口;FlowCollecter 接口:用于流的收集,可以是流的末端操作或中间操作,它提供public suspend fun emit(value: T)方法,方法参数 value 就是 数据生产者或者中间操作 emit 发送的值;SharedFlow 接口:继承 Flow 接口,并定义了public val replayCache: List<T>属性,它表示给新订阅者的(replay个数)值缓存快照;MutableSharedFlow 接口:继承 SharedFlow 和 FlowCollecter 接口,那么它就可以collect(collecter: FlowCollecter<T>)也可以emit(value: T);CancellableFlow 接口:继承 Flow 接口,是一个空接口,主要标记这个 Flow 是可以取消的,也就是 SharedFlow 是可以取消的;CancellableFlowImpl 类:实现了 Flow 接口的collect(collector: FlowCollector<T>)方法;FusibleFlow 接口:与 BufferOverflow 和 flowOn 操作结合起来一起工作;AbstractSharedFlow<S : AbstractSharedFlowSlot<*>> 抽象类:负责对订阅者的管理,接收AbstractSharedFlowSlot,继承了SynchronizedObject类;SynchronizedObject 类:协程内部负责提供加锁synchronized(lock: SynchronizedObject, block: () -> T)方法参数 的 lock 锁对象;AbstractSharedFlowSlot<SharedFlowImpl<*>> 抽象类:定义了fun allocateLocked(flow: F): Boolean和fun freeLocked(flow: F): Array<Continuation<Unit>?>方法,分别表示订阅者关联的 SharedFlowSlot 的申请和释放;SharedFlowSlot 类:继承 AbstractSharedFlowSlot 类,实现了allocateLocked和freeLocked抽象方法,并定义了 属性var index = -1L和var cont: Continuation<Unit>? = null,其中 index 表示将要在处理的数据在缓存数组中的索引,cont 表示用来保存等待新数据发送的订阅者的续体(包装订阅者);BufferOverflow 枚举类:流中的缓存区溢出处理策略,枚举值SUSPEND表示发送或发送值的上游在缓存区已满时挂起,枚举值DROP_OLDEST表示溢出时删除缓存区中最旧的值,将新值添加到缓存区,不要挂起,枚举值DROP_LATEST表示在缓存区溢出时删除当前添加到缓存区的最新值(以便缓存区内容保持不变),不要挂起;SharedFlowImpl 类:真正的 SharedFlow 实现类,继承了AbstractSharedFlow<SharedFlowSlot>抽象类 和 实现了MutableSharedFlow<T>, CancellableFlow<T>, FusibleFlow<T>接口。
从上面的信息,创建一个 SharedFlow 后,它提供的能力,可以简单综合概括为:可以使用 emit 发射数据,发射时涉及数据缓存,缓存溢出策略,是否会被挂起等问题;也可以使用 collect 订阅,订阅时涉及订阅者的管理,数据获取,是否会被挂起等问题。
发射
SharedFlowImpl 类实现了 FlowCollector接口的 emit 方法,当调用 emit 方法时:
- 如果有订阅者正在
collect当前 SharedFlow,且 onBufferOverflow: BufferOverflow = BufferOverflow.SUSPEND,此调用才可能会被挂起; - 如果没有订阅者正在
collect当前 SharedFlow,则不会使用缓存区。如果 replay != 0,则最近发出的值会简单地存储到 replay 缓存中,并替换 replay 缓存中旧的元素;如果 replay=0,则将最近发出的值丢弃; - emit 方法是被
suspend修饰的,与它相关的还有一个 非suspend修饰的方法:tryEmit; - 此方法是线程安全的,可以在没有外部同步的情况下从并发协程中安全地调用。
调用 emit 方法可能会被挂起
首先,看下emit 方法的实现:
    override suspend fun emit(value: T) {
        if (tryEmit(value)) return // fast-path
        emitSuspend(value)
    }
emit 方法会不会被挂起,主要取决于 tryEmit(value) 方法返回值,如果返回 true,那么就不会执行 emitSuspend(value),也就是不会被挂起,否则执行 emitSuspend(value),emit 会被挂起。
下面先看一下 emit 方法 不会挂起和会挂起的例子:
不会挂起,调用的是 tryEmit 方法

class TestFlow {
    private val _sharedFlow = MutableSharedFlow<Int>(
        replay = 0,
        extraBufferCapacity = 1,
        onBufferOverflow = BufferOverflow.SUSPEND
    )
    val sharedFlow: SharedFlow<Int> = _sharedFlow

    fun testSharedFlow() {
        MainScope().launch {
            Log.e("Flow", "sharedFlow:emit 1")
            _sharedFlow.emit(1)
        }
    }
  }

lifecycleScope.launch {
  testFlow.sharedFlow.collect(object : FlowCollector<Int> {
        override suspend fun emit(value: Int) {
               Log.e("Flow", "SharedFlow Collect: value=$value", Throwable())
        }
   })
}

控制台输出日志:
Flow                    com.wangjiang.example                 E  sharedFlow:emit 1
Flow                    com.wangjiang.example                 E  SharedFlow Collect: value=1
java.lang.Throwable
at com.wangjiang.example.fragment.TestFlowFragment$initView$5$1.emit(TestFlowFragment.kt:76)
at com.wangjiang.example.fragment.TestFlowFragment$initView$5$1.emit(TestFlowFragment.kt:174)
at kotlinx.coroutines.flow.SharedFlowImpl.collect$suspendImpl(SharedFlow.kt:383)
at kotlinx.coroutines.flow.SharedFlowImpl$collect$1.invokeSuspend(Unknown Source:15)
at kotlin.coroutines.jvm.internal.BaseContinuationImpl.resumeWith(ContinuationImpl.kt:33)
at kotlinx.coroutines.DispatchedTaskKt.resume(DispatchedTask.kt:234)
at kotlinx.coroutines.DispatchedTaskKt.resumeUnconfined(DispatchedTask.kt:190)
at kotlinx.coroutines.DispatchedTaskKt.dispatch(DispatchedTask.kt:161)
at kotlinx.coroutines.CancellableContinuationImpl.dispatchResume(CancellableContinuationImpl.kt:397)
at kotlinx.coroutines.CancellableContinuationImpl.resumeImpl(CancellableContinuationImpl.kt:431)
at kotlinx.coroutines.CancellableContinuationImpl.resumeImpl$default(CancellableContinuationImpl.kt:420)
at kotlinx.coroutines.CancellableContinuationImpl.resumeWith(CancellableContinuationImpl.kt:328)
at kotlinx.coroutines.flow.SharedFlowImpl.tryEmit(SharedFlow.kt:400)
at kotlinx.coroutines.flow.SharedFlowImpl.emit$suspendImpl(SharedFlow.kt:405)
at kotlinx.coroutines.flow.SharedFlowImpl.emit(Unknown Source:0)
at com.wangjiang.example.flow.TestFlow$testSharedFlow$1.invokeSuspend(TestFlow.kt:20)
at kotlin.coroutines.jvm.internal.BaseContinuationImpl.resumeWith(ContinuationImpl.kt:33)
at kotlinx.coroutines.DispatchedTask.run(DispatchedTask.kt:106)
at android.os.Handler.handleCallback(Handler.java:900)
at android.os.Handler.dispatchMessage(Handler.java:103)
at android.os.Looper.loop(Looper.java:219)
at android.app.ActivityThread.main(ActivityThread.java:8668)
at java.lang.reflect.Method.invoke(Native Method)
at com.android.internal.os.RuntimeInit$MethodAndArgsCaller.run(RuntimeInit.java:513)
at com.android.internal.os.ZygoteInit.main(ZygoteInit.java:1109)
将上面 MutableSharedFlow 构造方法中的 extraBufferCapacity = 1 修改为 extraBufferCapacity = 0,其它保持不变:
会挂起,调用的是 emitSuspend 方法

控制台输出日志:
Flow                    com.wangjiang.example                 E  sharedFlow:emit 1
Flow                    com.wangjiang.example                 E  SharedFlow Collect: value=1
java.lang.Throwable
at com.wangjiang.example.fragment.TestFlowFragment$initView$5$1.emit(TestFlowFragment.kt:76)
at com.wangjiang.example.fragment.TestFlowFragment$initView$5$1.emit(TestFlowFragment.kt:174)
at kotlinx.coroutines.flow.SharedFlowImpl.collect$suspendImpl(SharedFlow.kt:383)
at kotlinx.coroutines.flow.SharedFlowImpl$collect$1.invokeSuspend(Unknown Source:15)
at kotlin.coroutines.jvm.internal.BaseContinuationImpl.resumeWith(ContinuationImpl.kt:33)
at kotlinx.coroutines.DispatchedTaskKt.resume(DispatchedTask.kt:234)
at kotlinx.coroutines.DispatchedTaskKt.resumeUnconfined(DispatchedTask.kt:190)
at kotlinx.coroutines.DispatchedTaskKt.dispatch(DispatchedTask.kt:161)
at kotlinx.coroutines.CancellableContinuationImpl.dispatchResume(CancellableContinuationImpl.kt:397)
at kotlinx.coroutines.CancellableContinuationImpl.resumeImpl(CancellableContinuationImpl.kt:431)
at kotlinx.coroutines.CancellableContinuationImpl.resumeImpl$default(CancellableContinuationImpl.kt:420)
at kotlinx.coroutines.CancellableContinuationImpl.resumeWith(CancellableContinuationImpl.kt:328)
at kotlinx.coroutines.flow.SharedFlowImpl.emitSuspend(SharedFlow.kt:504)
at kotlinx.coroutines.flow.SharedFlowImpl.emit$suspendImpl(SharedFlow.kt:406)
at kotlinx.coroutines.flow.SharedFlowImpl.emit(Unknown Source:0)
at com.wangjiang.example.flow.TestFlow$testSharedFlow$1.invokeSuspend(TestFlow.kt:20)
at kotlin.coroutines.jvm.internal.BaseContinuationImpl.resumeWith(ContinuationImpl.kt:33)
at kotlinx.coroutines.DispatchedTask.run(DispatchedTask.kt:106)
at android.os.Handler.handleCallback(Handler.java:900)
at android.os.Handler.dispatchMessage(Handler.java:103)
at android.os.Looper.loop(Looper.java:219)
at android.app.ActivityThread.main(ActivityThread.java:8668)
at java.lang.reflect.Method.invoke(Native Method)
at com.android.internal.os.RuntimeInit$MethodAndArgsCaller.run(RuntimeInit.java:513)
at com.android.internal.os.ZygoteInit.main(ZygoteInit.java:1109)
上面两份日志区别在于:
emit→suspendImpl→tryEmit→CancellableContinuationImpl.resumeWith→DispatchedTaskKt.resume→TestFlowFragment$initView$5$1.emitemit→suspendImpl→emitSuspend→CancellableContinuationImpl.resumeWith→DispatchedTaskKt.resume→TestFlowFragment$initView$5$1.emit
从输出日志对比,当 onBufferOverflow策略为BufferOverflow.SUSPEND时,如果缓存空间extraBufferCapacity有值,emit 不会被挂起,否则会被挂起。所以,现在可以综合猜想 onBufferOverflow和 extraBufferCapacity 的值会影响 tryEmit方法的返回值。
  override fun tryEmit(value: T): Boolean {
        var resumes: Array<Continuation<Unit>?> = EMPTY_RESUMES
        val emitted = synchronized(this) {
            if (tryEmitLocked(value)) {
                resumes = findSlotsToResumeLocked(resumes)
                true
            } else {
                false
            }
        }
        for (cont in resumes) cont?.resume(Unit)
        return emitted
    }

    private fun tryEmitLocked(value: T): Boolean {
        // Fast path without collectors -> no buffering
        if (nCollectors == 0) return tryEmitNoCollectorsLocked(value) // always returns true
        // With collectors we'll have to buffer
        // 如果缓存已满且订阅者消费慢时,不能直接给订阅者值
        if (bufferSize >= bufferCapacity && minCollectorIndex <= replayIndex) {
            when (onBufferOverflow) {
                BufferOverflow.SUSPEND -> return false // will suspend
                BufferOverflow.DROP_LATEST -> return true // just drop incoming
                BufferOverflow.DROP_OLDEST -> {} // force enqueue & drop oldest instead
            }
        }
        enqueueLocked(value)
        bufferSize++ // value was added to buffer
        // drop oldest from the buffer if it became more than bufferCapacity
        if (bufferSize > bufferCapacity) dropOldestLocked()
        // keep replaySize not larger that needed
        if (replaySize > replay) { // increment replayIndex by one
            updateBufferLocked(replayIndex + 1, minCollectorIndex, bufferEndIndex, queueEndIndex)
        }
        return true
    }
tryEmit 方法的返回值取决于 emitted, emitted 的值又取决于 tryEmitLocked 方法的返回值。tryEmitLocked 的返回值是否为 false 取决于:
if (bufferSize >= bufferCapacity && minCollectorIndex <= replayIndex) {
            when (onBufferOverflow) {
                BufferOverflow.SUSPEND -> return false // will suspend
                BufferOverflow.DROP_LATEST -> return true // just drop incoming
                BufferOverflow.DROP_OLDEST -> {} // force enqueue & drop oldest instead
            }
        }
字段: bufferSize,bufferCapacity,minCollectorIndex,replayIndex,它们都是 SharedFlowImp 的全局变量。
private class SharedFlowImpl<T>(
    private val replay: Int, //新订阅者订阅时,重新发送多少个之前已发出的值给新订阅者
    private val bufferCapacity: Int, // replay+extraBufferCapacity,缓存容量
    private val onBufferOverflow: BufferOverflow //缓存溢出策略
) : AbstractSharedFlow<SharedFlowSlot>(), MutableSharedFlow<T>, CancellableFlow<T>, FusibleFlow<T> {
    /*
        Logical structure of the buffer 缓存逻辑结构

                  buffered values
             /-----------------------\
                          replayCache      queued emitters
                          /----------\/----------------------\
         +---+---+---+---+---+---+---+---+---+---+---+---+---+---+---+---+
         |   | 1 | 2 | 3 | 4 | 5 | 6 | E | E | E | E | E | E |   |   |   |
         +---+---+---+---+---+---+---+---+---+---+---+---+---+---+---+---+
               ^           ^           ^                      ^
               |           |           |                      |
              head         |      head + bufferSize     head + totalSize
               |           |           |
     index of the slowest  |    index of the fastest
      possible collector   |     possible collector
               |           |
               |     replayIndex == new collector's index
               \---------------------- /
          range of possible minCollectorIndex

          head == minOf(minCollectorIndex, replayIndex) // by definition
          totalSize == bufferSize + queueSize // by definition

       INVARIANTS:
          minCollectorIndex = activeSlots.minOf { it.index } ?: (head + bufferSize)
          replayIndex <= head + bufferSize
     */

    // Stored state 缓存存储状态
    private var buffer: Array<Any?>? = null // 缓存数组,用于保存 emit 发送的数据
    private var replayIndex = 0L // 新订阅者从 replayCache 中获取数据的起始位置
    private var minCollectorIndex = 0L //  当前活跃订阅者从缓存数组中获取数据时,对应的位置最小索引
    private var bufferSize = 0 // 缓存数组中 buffered values 的大小
    private var queueSize = 0 // 缓存数组中 queued emitters 的大小

    // Computed state 缓存计算状态
    private val head: Long get() = minOf(minCollectorIndex, replayIndex) // 缓存数组的起始位置
    private val replaySize: Int get() = (head + bufferSize - replayIndex).toInt() // 缓存数组中 replay 的大小
    private val totalSize: Int get() = bufferSize + queueSize // 缓存数组中已经缓存的数据数量
    private val bufferEndIndex: Long get() = head + bufferSize// 缓存数组中 buffered values 的结尾位置的后一位索引,也就是 queued emitters 的起始位置
    private val queueEndIndex: Long get() = head + bufferSize + queueSize 缓存数组中 queued emitters 的结尾位置的后一位索引
从上面 SharedFlowImpl 中的缓存逻辑结构,再结合:
MutableSharedFlow<Int>(
        replay = 0,
        extraBufferCapacity = 1 或 0,
        onBufferOverflow = BufferOverflow.SUSPEND
    )
当 extraBufferCapacity = 1 ,调用 emit 方法发射数据时,此时 bufferSize=0,bufferCapacity=1,minCollectorIndex=0,replayIndex=0,所以 bufferSize >= bufferCapacity && minCollectorIndex <= replayIndex 为 false,所以 tryEmitLocked 返回 true, tryEmit 返回 true, emit 不会被挂起。
当 extraBufferCapacity = 0 ,调用 emit 方法发射数据时,此时 bufferSize=0,bufferCapacity=0,minCollectorIndex=0,replayIndex=0,所以 bufferSize >= bufferCapacity && minCollectorIndex <= replayIndex 为 true,又因为 onBufferOverflow=BufferOverflow.SUSPEND,所以 tryEmitLocked 返回 false, tryEmit 返回 false, 所以会执行 emitSuspend,emit 会被挂起。
这就是调用 emit 方法可能会被挂起原因。其实,满足bufferSize >= bufferCapacity && minCollectorIndex <= replayIndex 判读条件就是缓存区溢出,这时需要选择处理策略,是 BufferOverflow.SUSPEND,还是 BufferOverflow.DROP_LATEST,还是 BufferOverflow.DROP_OLDEST。
缓存区
emit 发送的值存储在缓存数组 buffer 中:
private var buffer: Array<Any?>? = null // 缓存数组,用于保存 emit 发送的数据
buffer 包含: buffered values 和 queued emitters。
其中 buffered values 中存储的是 emit(value) 方法中的 value 值,buffered values 的大小取决于 bufferCapacity=replay + extraBufferCapacity,replay 和 extraBufferCapacity 就是创建 MutableSharedFlow( replay: Int = 0, extraBufferCapacity: Int = 0, onBufferOverflow: BufferOverflow = BufferOverflow.SUSPEND )传入的值,所以 buffered values 也分为两部分:replay 和 extraBufferCapacity。
其中 queued emitters 中存储的是 emit(value) 方法中的 value 被包装成的 Emitter 值:
private suspend fun emitSuspend(value: T) = suspendCancellableCoroutine<Unit> sc@{ cont ->
        var resumes: Array<Continuation<Unit>?> = EMPTY_RESUMES
        val emitter = synchronized(this) lock@{
            // recheck buffer under lock again (make sure it is really full)
            if (tryEmitLocked(value)) {
                cont.resume(Unit)
                resumes = findSlotsToResumeLocked(resumes)
                return@lock null
            }
            // add suspended emitter to the buffer
            // 将 value 包装成 Emitter 对象存储到 buffer 中,存储位置为 queued emitters 的起始结束位置范围
            Emitter(this, head + totalSize, value, cont).also {
                enqueueLocked(it)
                queueSize++ // added to queue of waiting emitters
                // synchronous shared flow might rendezvous with waiting emitter
                if (bufferCapacity == 0) resumes = findSlotsToResumeLocked(resumes)
            }
        }
        // outside of the lock: register dispose on cancellation
        emitter?.let { cont.disposeOnCancellation(it) }
        // outside of the lock: resume slots if needed
        for (r in resumes) r?.resume(Unit)
    }

 private class Emitter(
        @JvmField val flow: SharedFlowImpl<*>,
        @JvmField var index: Long,
        @JvmField val value: Any?,
        @JvmField val cont: Continuation<Unit>
    ) : DisposableHandle {
        override fun dispose() = flow.cancelEmitter(this)
    }
在 emit 挂起时(缓存区 buffered values 已满或大小为0),才存储 Emitter 值到 buffer 中。
现在存储值到 buffer 中,有下面几条链路:
emit→tryEmit→tryEmitLocked→tryEmitNoCollectorsLocked→enqueueLockedemit→tryEmit→tryEmitLocked→enqueueLockedemit→emitSuspend→tryEmitLocked→tryEmitNoCollectorsLocked→enqueueLockedemit→emitSuspend→tryEmit→tryEmitLocked→enqueueLockedemit→emitSuspend→Emitter→enqueueLocked
 // enqueues item to buffer array, caller shall increment either bufferSize or queueSize
    private fun enqueueLocked(item: Any?) {
        val curSize = totalSize
        val buffer = when (val curBuffer = buffer) {
           // 创建一个大小为 2 的缓存数组
            null -> growBuffer(null, 0, 2)
            // 如果当前缓存数据已经存满,则扩容,扩大为原来的 2 倍
            else -> if (curSize >= curBuffer.size) growBuffer(curBuffer, curSize,curBuffer.size * 2) else curBuffer
        }
        buffer.setBufferAt(head + curSize, item)
    }
没有订阅者正在 collect 当前 SharedFlow
当没有订阅者正在 collect 当前 SharedFlow,存储值到 buffer 中,会尝试走链路:
emit→tryEmit→tryEmitLocked→tryEmitNoCollectorsLocked→enqueueLockedemit→emitSuspend→tryEmitLocked→tryEmitNoCollectorsLocked→enqueueLocked
private fun tryEmitLocked(value: T): Boolean {
        // Fast path without collectors -> no buffering
        if (nCollectors == 0) return tryEmitNoCollectorsLocked(value) // always returns true
        // ..... 省略
        return true
    }

 private fun tryEmitNoCollectorsLocked(value: T): Boolean {
        assert { nCollectors == 0 }
        if (replay == 0) return true // no need to replay, just forget it now
        enqueueLocked(value) // enqueue to replayCache
        bufferSize++ // value was added to buffer
        // drop oldest from the buffer if it became more than replay
        if (bufferSize > replay) dropOldestLocked()
        minCollectorIndex = head + bufferSize // a default value (max allowed)
        return true
    }
此时,如果又 replay=0,则不会使用缓存区。否则会将 emit(value) 中 value 存储到 buffer 数组中 buffered values 的 replayCache 起始结束范围位置内。
replay 的值
当有订阅者正在 collect 当前 SharedFlow,此时,如果 replay=0,extraBufferCapacity=0,则会尝试走链路:
emit→emitSuspend→Emitter→enqueueLockedemit(value) 中 value值 包装成 Emitter 对象存储到 buffer 数组中的 queued emitters 起始结束范围位置内。当没有订阅者时,emit(value) 中 value 就会被丢弃。
如果 replay!=0 或 extraBufferCapacity!=0,会尝试走链路:
emit→tryEmit→tryEmitLocked→enqueueLockedemit→emitSuspend→tryEmit→tryEmitLocked→enqueueLockedemit→emitSuspend→Emitter→enqueueLockedemit(value) 方法中的 value 值会被存储到 buffer 数组中 buffered values 或 queued emitters 起始结束范围位置内,当存储到 buffered values 起始结束范围位置内,replayCache 起始结束范围位置内的值会更新,还会受到缓存溢出策略 onBufferOverflow(BufferOverflow.SUSPEND,BufferOverflow.DROP_LATEST 或 BufferOverflow.DROP_OLDEST)影响。
收集
根据上面发射的分析,收集就是从缓存区
buffer中去取值,可以从 buffered values 区域直接取出 value 值,或可以从 queued emitters 取出 Emitter 对象拆解出 value 值。
SharedFlowImpl 类实现了 Flow接口的 collect 方法:
 override suspend fun collect(collector: FlowCollector<T>) {
        // 分配一个 SharedFlowSlot
        val slot = allocateSlot()
        try {
           // 如果订阅者是一个 SubscribedFlowCollector,则先告诉订阅者开始订阅
            if (collector is SubscribedFlowCollector) collector.onSubscription()
            // 当前订阅者所在协程
            val collectorJob = currentCoroutineContext()[Job]
            // 死循环
            while (true) {
                var newValue: Any?
                // 死循环
                while (true) {
                   // 通过分配的 slot 去从缓存区 buffer 获取值
                    newValue = tryTakeValue(slot) // attempt no-suspend fast path first
                    // 获取到值
                    if (newValue !== NO_VALUE) break
                    // 没有获取到值,订阅者所在协程会被挂起,等待 emit 发射新数据到缓存区
                    awaitValue(slot) // await signal that the new value is available
                }
                //确认订阅者所在协程是否还存活,如果不存活,会抛出 CancellationException 异常,直接到 finally
                collectorJob?.ensureActive()
                // 将新值给订阅者
                collector.emit(newValue as T)
            }
        } finally {
            // 订阅者不存活时,释放分配的 slot
            freeSlot(slot)
        }
    }
订阅者订阅时主要的步骤是:
分配一个 SharedFlowSlot:
val slot = allocateSlot()通过分配的 slot 去从缓存区 buffer 获取值:
newValue = tryTakeValue(slot);如果获取值成功,就直接进入下一步,否则订阅者所在协程会被挂起,等待 emit 发射新数据到缓存区:awaitValue(slot)确认订阅者所在协程是否还存活,如果不存活,会抛出
CancellationException异常,直接到 finally:collectorJob?.ensureActive()将新值给订阅者:
collector.emit(newValue as T)订阅者不存活时,释放分配的 slot:
freeSlot(slot)下面分析一下
allocateSlot,tryTakeValue(slot),awaitValue和freeSlot。
allocateSlot
allocateSlot 方法定义在 SharedFlowImpl 继承的 AbstractSharedFlow 抽象类中:
    @Suppress("UNCHECKED_CAST")
    protected var slots: Array<S?>? = null // 用于管理给订阅者分配的 slot
        private set
    protected var nCollectors = 0 // 还存活的订阅者数量
        private set
    private var nextIndex = 0 // 分配下一个 slot 对象在 slots 数组中的索引
    private var _subscriptionCount: MutableStateFlow<Int>? = null // 用一个 StateFlow 来记录订阅者数量

    protected fun allocateSlot(): S {
        // Actually create slot under lock
        var subscriptionCount: MutableStateFlow<Int>? = null
        // 加锁
        val slot = synchronized(this) {
            // 获取一个 Array<SharedFlowSlot?> 对象
            val slots = when (val curSlots = slots) {
                // 新创建一个大小为 2 的 Array<SharedFlowSlot?>
                null -> createSlotArray(2).also { slots = it }
                // 扩容,容量扩大为原来 Array<SharedFlowSlot?>  的 2 倍
                else -> if (nCollectors >= curSlots.size) {
                    curSlots.copyOf(2 * curSlots.size).also { slots = it }
                } else {
                    // 直接使用当前的 Array<SharedFlowSlot?>
                    curSlots
                }
            }
            // 下面为从上面的 slots 数组中获取一个 slot 对象
            var index = nextIndex
            var slot: S
            while (true) {
                slot = slots[index] ?: createSlot().also { slots[index] = it }
                index++
                if (index >= slots.size) index = 0
                // 给 slot 的属性 index 赋值,index 的值指向的缓存区 buffer 中的 index
                if ((slot as AbstractSharedFlowSlot<Any>).allocateLocked(this)) break // break when found and allocated free slot
            }
            nextIndex = index
            // 订阅者加1
            nCollectors++
            subscriptionCount = _subscriptionCount // retrieve under lock if initialized
            slot
        }
        // 订阅数量加 1
        subscriptionCount?.increment(1)
        return slot
    }
从上面的代码逻辑,这个方法的主要作用是:为订阅者分配一个 SharedFlowSlot 对象,该对象可以用来关联从缓存区 buffer 获取值的索引,也就是可以用来确定订阅者将要收到的值,以及将订阅者所在协程挂起,等待有新值发送到缓冲区 buffer。
关于 SharedFlowSlot 类:
private class SharedFlowSlot : AbstractSharedFlowSlot<SharedFlowImpl<*>>() {
    @JvmField
    var index = -1L // 指向缓冲区 buffer 中的索引,值为 -1 表示当前 slot 已经被释放
    //......省略
    override fun allocateLocked(flow: SharedFlowImpl<*>): Boolean {
        if (index >= 0) return false // not free
        index = flow.updateNewCollectorIndexLocked()
        return true
    }
    //......省略
}

    internal fun updateNewCollectorIndexLocked(): Long {
        val index = replayIndex
        if (index < minCollectorIndex) minCollectorIndex = index
        return index
    }
为订阅者分配的 slot 对象的变量 index ,它从缓存区 buffer 获取值的初始值索引为 replayIndex(index=replayIndex),也就是新订阅者从 replayCache 中的起始位置开始获取值。
tryTakeValue
tryTakeValue 方法的作用是:通过 SharedFlowSlot 的 index 从缓存区 buffer 获取值,index 指向的可能是缓存区 buffer 中的 buffered values 或 queued emitters 起始结束位置范围。当取值成功后,index 指向缓存区 buffer 的下一个位置slot.index = index + 1:
    private fun tryTakeValue(slot: SharedFlowSlot): Any? {
        var resumes: Array<Continuation<Unit>?> = EMPTY_RESUMES
        // 加锁
        val value = synchronized(this) {
            // 通过 slot ,获取指向的缓存区 buffer 中的 index
            val index = tryPeekLocked(slot)
            if (index < 0) {
                // 没有值
                NO_VALUE
            } else {
                // 记录一下当前 slot 的 index
                val oldIndex = slot.index
                // 通过上面的 index,从缓存区 buffer 中取出对应的值
                val newValue = getPeekedValueLockedAt(index)
                // slot 的 index 指向缓存区 buffer 中的下一位 index+1
                slot.index = index + 1 // points to the next index after peeked one
                // 更新缓存数组的位置,并获取缓存数组与订阅者数组中可恢复的续体
                resumes = updateCollectorIndexLocked(oldIndex)
                newValue
            }
        }
        for (resume in resumes) resume?.resume(Unit)
        return value
    }
判断 index 是符合缓存区 buffer 中的 buffered values 还是 queued emitters 的起始结束位置范围,主要通过 tryPeekLocked 方法:
// returns -1 if cannot peek value without suspension
    private fun tryPeekLocked(slot: SharedFlowSlot): Long {
        // slot.index 刚开始的值是 replayIndex,也就是指向 buffered values(参看上面的 updateNewCollectorIndexLocked 方法 )
        val index = slot.index

        // 如果 index 在 buffered values  的起始结束位置范围内,直接返回
        if (index < bufferEndIndex) return index
        // 下面的逻辑都是用来判断是否能在 queued emitters 取值

        // index>=bufferEndIndex ,此时如果 buffered values 的容量又大于0,找不到值
        if (bufferCapacity > 0) return -1L

        // 此时缓存数组只有 queued emitters,不能取起始位置后面的 Emitter,所以找不到值
        // 因为 head=minOf(minCollectorIndex, replayIndex)
        if (index > head) return -1L

        // 缓存数组大小为0 ,找不到值
        if (queueSize == 0) return -1L

        // 从 queued emitters 起始结束位置范围内取值
        return index
    }
awaitValue
当 tryTakeValue 方法返回 NO_VALUE 值,也就是 tryPeekLocked 方法返回 -1L 时,此时在缓存区 buffer 找不到对应的 index,就会执行 awaitValue:
    // 这个方法是一个挂起方法
    private suspend fun awaitValue(slot: SharedFlowSlot): Unit = suspendCancellableCoroutine { cont ->
        synchronized(this) lock@{
            // 再此尝试获取指向的缓存区 buffer 中的 index
            val index = tryPeekLocked(slot) // recheck under this lock
            if (index < 0) {
                // 没有找到,给 slot 对象 cont 赋值,也就是让订阅者所在协程挂起
                slot.cont = cont // Ok -- suspending
            } else {
                // 找到,恢复协程,不需要挂起
                cont.resume(Unit) // has value, no need to suspend
                return@lock
            }
            slot.cont = cont // suspend, waiting
        }
    }
该方法的主要作用是:将订阅者封装成 Continuation 接口实现类对象,挂起订阅者所在协程。
slot.cont 是一个 Continuation 接口实现类对象:
public interface Continuation<in T> {
    /**
     *  关联的协程
     */
    public val context: CoroutineContext

    /**
     *  恢复关联的协程,传递一个 successful 或 failed 结果值过去
     *
     */
    public fun resumeWith(result: Result<T>)
}
它的 context 关联的就是订阅者所在的协程。所以 slot.cont 的值存储的是关联订阅者的 Continuation 对象。
freeSlot
freeSlot 方法与 allocateSlot 相对应,当订阅者不再存活时,freeSlot 方法就会执行:
    protected fun freeSlot(slot: S) {
        // 使用 StateFlow 保存订阅数量
        var subscriptionCount: MutableStateFlow<Int>? = null
        // 加锁
        val resumes = synchronized(this) {
            // 订阅者数量减1
            nCollectors--
            subscriptionCount = _subscriptionCount
            //  如果没有订阅者,下一次在 slots 中分配 slot 对象,从索引0开始
            if (nCollectors == 0) nextIndex = 0
            // slot 对象的真正释放
            (slot as AbstractSharedFlowSlot<Any>).freeLocked(this)
        }
        /*
           Resume suspended coroutines.
           This can happens when the subscriber that was freed was a slow one and was holding up buffer.
           When this subscriber was freed, previously queued emitted can now wake up and are resumed here.
        */
        for (cont in resumes) cont?.resume(Unit)
        // 订阅数量减1
        subscriptionCount?.increment(-1)
    }
这个方法主要的作用:记录的订阅者数量减1,以及将 slot 对象中 index 和 cont 重置,也就是 index 不再指向缓存区 buffer 的起始结束位置范围,cout 不再关联订阅者所在协程。
private class SharedFlowSlot : AbstractSharedFlowSlot<SharedFlowImpl<*>>() {
    @JvmField
    var index = -1L // 指向缓冲区 buffer 中的索引,值为 -1 表示当前 slot 已经被释放
    //......省略
    @JvmField
    var cont: Continuation<Unit>? = null // 用来保存等待新数据发送的订阅者的续体,当订阅者等待新值时用到

    //......省略
    override fun freeLocked(flow: SharedFlowImpl<*>): Array<Continuation<Unit>?> {
        assert { index >= 0 }
        val oldIndex = index
        index = -1L
        cont = null // cleanup continuation reference
        return flow.updateCollectorIndexLocked(oldIndex)
    }
}
在 freeLocked中调用的 flow.updateCollectorIndexLocked(oldIndex)方法用于更新缓存数组的位置。
到这里,SharedFlow 的创建,发送 和 收集分析结束。对于它的特点:共享和独立存在有了一个大概的理解。
业务场景
知道了 SharedFlow 的创建,发送 和 收集原理后,基于它共享和独立存在的特点,可以在业务中用来做事件总线,类似以前使用的 EventBus。下面是一个 SharedFlow 实现的 EventBus 简单例子:
定义事件总线:
object EventBus {
    private val events = ConcurrentHashMap<String, MutableSharedFlow<Event>>()

    private fun getOrPutEventFlow(eventName: String): MutableSharedFlow<Event> {
        return events[eventName] ?: MutableSharedFlow<Event>().also { events[eventName] = it }
    }

    fun getEventFlow(event: Class<Event>): SharedFlow<Event> {
        return getOrPutEventFlow(event.simpleName).asSharedFlow()
    }

    suspend fun produceEvent(event: Event) {
        val eventName = event::class.java.simpleName
        getOrPutEventFlow(eventName).emit(event)
    }

    fun postEvent(event: Event, delay: Long = 0, scope: CoroutineScope = MainScope()) {
        scope.launch {
            delay(delay)
            produceEvent(event)
        }
    }
}

@Keep
open class Event(val value: Int) {
}
事件发射和订阅:
        lifecycleScope.launch {
            EventBus.getEventFlow(Event::class.java).collect {
                Log.e("Flow", "EventBus Collect: value=${it.value}")
            }
        }
        EventBus.postEvent(Event(1), 0, lifecycleScope)
        EventBus.postEvent(Event(2), 0)

控制台输出结果:
Flow                    com.example.wangjaing                E  EventBus Collect: value=1
Flow                    com.example.wangjaing                E  EventBus Collect: value=2
使用 SharedFlow 来做事件总线,有以下优点:
- 事件可以延迟发送
- 可以定义粘性事件
- 事件可以感知 Activity 或 Fragment 的生命周期
- 事件是有序的
总结
在热流 SharedFlow 中,当它创建以后它就存在了,它可以在生产者 emit 数据时,没有消费者 collect 数据而独立运行。当生产者 emit 数据后,这些数据会被缓存下来,新老消费者都可以收到这些数据,从而达到共享数据。
对于发射数据操作,会受到 MutableSharedFlow 构造方法参数 replay, extraBufferCapacity,onBufferOverflow 值的影响,这些参数会决定发射操作是挂起还是不挂起。发射的数据,将使用缓存数组进行管理,管理区域分为 buffered values 和 queued emitters。replay 和extraBufferCapacity 参数决定了buffered values 区域的大小,当 buffered values 区域存满溢出时,会根据溢出策略 onBufferOverflow 进行区域调整。当 replay=0 和 extraBufferCapacity=0 ,或 replay!=0 和 extraBufferCapacity!=0 且 buffered values 区域存满, 发射的数据将被包装成 Emitter 存储到 queued emitters 区域。另外,订阅者数量决定了发射数据是存储到缓存区还是丢弃。最后,缓存区存储的数据对所有订阅者共享。
对于收集数据操作,使用 slots: Array<SharedFlowSlot?> 数组来管理订阅者,其中每一个 slot 对象对应一个订阅者,slot 对象的 slot.index 将订阅者要收集的数据与缓存区关联起来,slot.cont 将订阅者所在协程与 SharedFlow上下文关联起来。如果通过 slot.index 能在缓存区取到值,就直接将值给订阅者。否则就将订阅者封装成 Continuation 接口实现类对象存储到 slot.cont 中,挂起订阅者所在协程,等待缓存区有值时,再恢复订阅者协程并给它值。当订阅者协程不存活时,会释放订阅者关联的 slot 对象,也就是重置 slot.inext 和 slot.cont 的值,并重新调整缓存数组的位置。
StateFlow
StateFlow 也是基于 SharedFlow 实现的,所以可以把 StateFlow 理解为 SharedFlow 的一种特殊存在。
public interface StateFlow<out T> : SharedFlow<T> {
    /**
     * The current value of this state flow.
     */
    public val value: T
}
StateFlow ,它也是热流,它也能让所有收集器共享它所发出的值,只不过这个值为当前最新的值,它的实例也可以独立于收集器的存在而存在。
下面将从 StateFlow 的创建,发送 和 收集来分析,原理与 SharedFlow 的创建,发送 和 收集类似,所以这里只做简单分析。
创建
创建一个 StateFlow 使用的是 SharedFlowKt 提供的 MutableStateFlow 构造方法:
public fun <T> MutableStateFlow(value: T): MutableStateFlow<T> = StateFlowImpl(value ?: NULL)

private class StateFlowImpl<T>(
    initialState: Any // T | NULL
) : AbstractSharedFlow<StateFlowSlot>(), MutableStateFlow<T>, CancellableFlow<T>, FusibleFlow<T> {
   private val _state = atomic(initialState)
   //......省略
}
StateFlow 必须要有一个初始值,这个值被缓存在一个原子对象里面:_state = atomic(initialState)。如果这个值没有更新,那么订阅者订阅时,将收到这个值。
发射
StateFlowImpl 类实现了发射数据 emit 和 tryEmit 方法:
private class StateFlowImpl<T>(
    initialState: Any // T | NULL
) : AbstractSharedFlow<StateFlowSlot>(), MutableStateFlow<T>, CancellableFlow<T>, FusibleFlow<T> {
    // 缓存当前值原子对象
    private val _state = atomic(initialState)
    private var sequence = 0


    public override var value: T
        get() = NULL.unbox(_state.value)
        //发送时,更新当前值,并缓存在 _state 中
        set(value) { updateState(null, value ?: NULL) }

    override fun compareAndSet(expect: T, update: T): Boolean =
        updateState(expect ?: NULL, update ?: NULL)

    //更新原子对象 _state 的值
    private fun updateState(expectedState: Any?, newState: Any): Boolean {
        var curSequence = 0
        // 订阅者关联的 slots
        var curSlots: Array<StateFlowSlot?>? = this.slots
        synchronized(this) {
            val oldState = _state.value
            if (expectedState != null && oldState != expectedState) return false // CAS 操作
            if (oldState == newState) return true // 如果当前值和新值相等,则不用更新,也不用通知订阅者
            // 将新值更新到缓存中
            _state.value = newState
            curSequence = sequence
            if (curSequence and 1 == 0) {
                curSequence++ //
                sequence = curSequence
            } else {

                sequence = curSequence + 2 // change sequence to notify, keep it odd
                return true
            }
            curSlots = slots // read current reference to collectors under lock
        }
       //......省略
    }

   //......省略
   //非挂起发送
    override fun tryEmit(value: T): Boolean {
        this.value = value
        return true
    }
    //挂起发送
    override suspend fun emit(value: T) {
        this.value = value
    }

}
这两个方法都是去更新缓存对象 _state 存储的 value 值,如果当前值和新值相等,则不会更新,否则更新,并把新值给订阅者。
收集
根据上面发射的分析,收集就是从缓存 _state 中去取值。
StateFlowImpl 类实现了 Flow接口的 collect 方法:
    override suspend fun collect(collector: FlowCollector<T>): Nothing {
        // 分配一个 StateFlowSlot
        val slot = allocateSlot()
        try {
            // 如果订阅者是 SubscribedFlowCollector 类型,则告诉订阅者订阅开始
            if (collector is SubscribedFlowCollector) collector.onSubscription()
            // 当前协程
            val collectorJob = currentCoroutineContext()[Job]
            // 记录一下上一个缓存值
            var oldState: Any? = null
            // 死循环
            while (true) {
                // Here the coroutine could have waited for a while to be dispatched,
                // 获取当前缓存值
                val newState = _state.value
                // 确认订阅者所在协程是否还存活,如果不存活,会抛出 `CancellationException` 异常,直接到 finally
                collectorJob?.ensureActive()
                // 如果上一个缓存值为空或新值不等于上一个缓存值,则将新值给订阅者
                if (oldState == null || oldState != newState) {
                    collector.emit(NULL.unbox(newState))
                    //更新记录的缓存值
                    oldState = newState
                }
                // 判断订阅者是否需要挂起
                if (!slot.takePending()) {
                    //订阅者所在协程会被挂起,等待 emit 发射新数据到缓存
                    slot.awaitPending()
                }
            }
        } finally {
           // 订阅者不存活时,释放分配的 slot
            freeSlot(slot)
        }
    }
订阅者订阅时主要的步骤是:
- 分配一个 StateFlowSlot:
val slot = allocateSlot() - 通过分配的 slot 去从缓存
_state中取值:val newState = _state.value - 确认订阅者所在协程是否还存活,如果不存活,会抛出
CancellationException异常,直接到 finally:collectorJob?.ensureActive() - 将新值给订阅者:
collector.emit(NULL.unbox(newState)) - 订阅者不存活时,释放分配的 slot:
freeSlot(slot)
业务场景
知道了 StateFlow 的创建,发送 和 收集的大致原理后,以及它共享最新状态的特点。在业务中可以用来做状态更新(替换 LiveData)。
比如从服务端获取一个列表数据,并把列表数据展示到 UI。下面使用 MVI (Model-View-Intent)来做:
Data Layer:
class FlowRepository private constructor() {

    companion object {
        @JvmStatic
        fun newInstance(): FlowRepository = FlowRepository()
    }

    fun requestList(): Flow<List<ItemBean>> {
        val call = ServiceGenerator
            .createService(FlowListApi::class.java)
            .getList()
        return flow {
            emit(call.execute())
        }.flowOn(Dispatchers.IO).filter { it.isSuccessful }
            .map {
                it.body()?.data
            }
            .filterNotNull().catch {
                emit(emptyList())
            }.onEmpty {
                emit(emptyList())
            }
    }
}
ViewModel:
class ListViewModel : ViewModel() {

    private val repository: FlowRepository = FlowRepository.newInstance()

    private val _uiIntent: Channel<FlowViewIntent> = Channel()
    private val uiIntent: Flow<FlowViewIntent> = _uiIntent.receiveAsFlow()

    private val _uiState: MutableStateFlow<FlowViewState<List<ItemBean>>> =
        MutableStateFlow(FlowViewState.Init())
    val uiState: StateFlow<FlowViewState<List<ItemBean>>> = _uiState

    fun sendUiIntent(intent: FlowViewIntent) {
        viewModelScope.launch {
            _uiIntent.send(intent)
        }
    }

    init {
        viewModelScope.launch {
            uiIntent.collect {
                handleIntent(it)
            }
        }
    }

    private fun handleIntent(intent: FlowViewIntent) {
        viewModelScope.launch {
            repository.requestList().collect {
                if (it.isEmpty()) {
                    _uiState.emit(FlowViewState.Failure(0, "data is invalid"))
                } else {
                    _uiState.emit(FlowViewState.Success(it))
                }
            }
        }
    }
}


data class FlowViewIntent()

sealed class FlowViewState<T> {
    @Keep
    class Init<T> : FlowViewState<T>()

    @Keep
    class Success<T>(val result: T) : FlowViewState<T>()

    @Keep
    class Failure<T>(val code: Int, val msg: String) : FlowViewState<T>()
}
UI:
 private var isRequestingList = false
 private lateinit var listViewModel: ListViewModel

 private fun initData() {
        listViewModel = ViewModelProvider(this)[ListViewModel::class.java]
        lifecycleScope.launchWhenStarted {
            listViewModel.uiStateFlow.collect {
                when (it) {
                    is FlowViewState.Success -> {
                        showList(it.result)
                    }
                    is FlowViewState.Failure -> {
                        showListIfFail()
                    }
                    else -> {}
                }
            }
        }
        requestList()
    }

  private fun requestList() {
        if (!isRequestingList) {
            isRequestingList = true
            listViewModel.sendUiIntent( FlowViewIntent() )
        }
    }
使用 StateFlow 替换 LiveData ,并用结合 MVI 替换 MVVM 后,可以有以下优点:
- 唯一可信数据源:MVVM 中 可能会存在大量 LiveData,这导致数据交互或并行更新出现逻辑不可控,添加 UIState 结合 StateFlow ,数据源只有 UIState;
- 数据单向流动:MVVM 中存在数据 UI ⇆ ViewModel 相互流动,而 MVI 中数据只能从 Data Layer → ViewModel → UI 流动,数据是单向流动的。
使用 StateFlow 替换 LiveData 来做事件状态更新,有以下区别:
- StateFlow 需要将初始状态传递给构造函数,而 LiveData 不需要。
- 当 View 进入 STOPPED 状态时,LiveData.observe() 会自动取消注册使用方,而从 StateFlow 或任何其他数据流收集数据的操作并不会自动停止。如需实现相同的行为,需要从 Lifecycle.repeatOnLifecycle 块收集数据流。
总结
热流 StateFlow,基于 SharedFlow 实现,所以它也有独立存在和共享的特点。但在 StateFlow 中发射数据,只有最新的值被缓存下来,所以当新老订阅者订阅时,只会收到它最后一次更新的值,如果发射的新值和当前值相等,订阅者也不会收到通知。
文档信息
- 本文作者:Wang Jiang
- 本文链接:https://wjrye.github.io/2023/04/23/Kotlin-Hot-Cold-Flow-Intro/
- 版权声明:自由转载-非商用-非衍生-保持署名(创意共享3.0许可证)