为什么要使用 LeakCanary?
内存泄漏的原因:不再需要的对象依然被引用,导致对象被分配的内存无法被回收。
例如:一个 Activity 实例对象在调用了 onDestory 方法后是不再被需要的,如果存储了一个引用 Activity 对象的静态域,将导致 Activity 无法被垃圾回收器回收。
LeakCanary 标识一个需要更长时间的对象,并找到防止其被垃圾收集的引用链。
引用链来自于垃圾回收器的可达性分析算法:当一个对象到GC Roots 没有任何引用链相连时,则证明此对象是不可用的。如图: 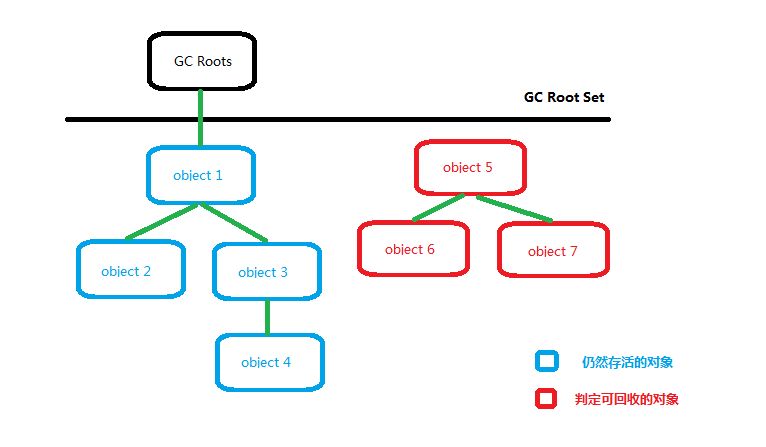 对象object5、object6、object7 虽然互相有关联,但是它们到 GC Roots 是不可达的,所以它们将会被判定为是可回收的对象。
在 Java 语言中,可作为 GC Roots的对象包括下面几种:
- 虚拟机栈(栈帧中的本地变量表)中引用的对象。
- 方法区中静态属性引用的对象。
- 方法区中常量引用的对象。
- 本地方法栈中 JNI(即一般说的 Native 方法)引用的对象。
LeakCanary 是怎么工作的?
- RefWatcher.watch() 创建了一个 KeyedWeakReference 来监视对象.
- 稍后,在后台线程中,检查引用是否已被清除,如果没有,则触发 GC。
- 如果引用一直没有被清除,它会dumps the heap 到一个.hprof 文件中,然后将.hprof 文件存储到文件系统。
- HeapAnalyzerService 在单独的进程中启动,HeapAnalyzer 使用HAHA来解析dump heap。
- HeapAnalyzer 通过唯一的引用key来找到heap dump 中的 KeyedWeakReference,并定位内存泄漏引用。
- HeapAnalyzer 计算到GC Roots的最短强引用链路径来确定是否有泄漏,然后构建导致泄漏的引用链。
- 然后将结果返回到应用程序进程中的 DisplayLeakService,并显示泄漏通知。
源码分析
初始化
代码从LeakCanary.install(this) 方法开始,它主要是创建一个 RefWatcher 对象,然后开始监视 activity 或 fragment 对象。install 方法代码如下:
  /**
   * Creates a {@link RefWatcher} that works out of the box, and starts watching activity
   * references (on ICS+).
   */
  public static @NonNull RefWatcher install(@NonNull Application application) {
    return refWatcher(application).listenerServiceClass(DisplayLeakService.class)
        .excludedRefs(AndroidExcludedRefs.createAppDefaults().build())
        .buildAndInstall();
  }
- refWatcher(application):创建了一个AndroidRefWatcherBuilder类对象,AndroidRefWatcherBuilder类主要是设置一些默认信息。
- listenerServiceClass(DisplayLeakService.class):设置监听分析结果的监听器。当内存泄漏结果分析完成,会调用DisplayLeakService监听器的onHeapAnalyzed()方法。
- excludedRefs(AndroidExcludedRefs.createAppDefaults().build()):过滤掉一些由于SDK版本和制造厂商本身引起的内存泄漏问题。AndroidExcludedRefs是一个枚举类,它列举了所遇到的内存泄漏问题。例如:在SDK版本19到21之间,ActivityClientRecord类中的nextIdle域变量会保持引用已经调用onDestroy()方法的Activity对象,导致内存泄漏。
- buildAndInstall():开始监视Activity和Fragment对象。
buildAndInstall() 方法中的操作
在 buildAndInstall() 方法中:
 /**
 1. Creates a {@link RefWatcher} instance and makes it available through {@link
 2. LeakCanary#installedRefWatcher()}.
 3.  4. Also starts watching activity references if {@link #watchActivities(boolean)} was set to true.
 4.  6. @throws UnsupportedOperationException if called more than once per Android process.
   */
  public @NonNull RefWatcher buildAndInstall() {
    if (LeakCanaryInternals.installedRefWatcher != null) {
      throw new UnsupportedOperationException("buildAndInstall() should only be called once.");
    }
    RefWatcher refWatcher = build();
    if (refWatcher != DISABLED) {
      LeakCanaryInternals.setEnabledAsync(context, DisplayLeakActivity.class, true);
      if (watchActivities) {
        ActivityRefWatcher.install(context, refWatcher);
      }
      if (watchFragments) {
        FragmentRefWatcher.Helper.install(context, refWatcher);
      }
    }
    LeakCanaryInternals.installedRefWatcher = refWatcher;
    return refWatcher;
  }
1.RefWatcher类
RefWatcher refWatcher = build(); 其实等于 RefWatcher refWatcher = new RefWatcher(watchExecutor, debuggerControl, gcTrigger, heapDumper, heapDumpListener,heapDumpBuilder);下面为RefWatcher的构造方法:
  RefWatcher(WatchExecutor watchExecutor, DebuggerControl debuggerControl, GcTrigger gcTrigger,
      HeapDumper heapDumper, HeapDump.Listener heapdumpListener, HeapDump.Builder heapDumpBuilder) {
    this.watchExecutor = checkNotNull(watchExecutor, "watchExecutor");
    this.debuggerControl = checkNotNull(debuggerControl, "debuggerControl");
    this.gcTrigger = checkNotNull(gcTrigger, "gcTrigger");
    this.heapDumper = checkNotNull(heapDumper, "heapDumper");
    this.heapdumpListener = checkNotNull(heapdumpListener, "heapdumpListener");
    this.heapDumpBuilder = heapDumpBuilder;
    retainedKeys = new CopyOnWriteArraySet<>();
    queue = new ReferenceQueue<>();
  }
- watchExecutor:WatchExecutor接口的实现类是AndroidWatchExecutor,AndroidWatchExecutor 类用于监视Android 对象泄漏,它等待主线程成变成空闲时,然后再延迟一个指定的时间发送到后台线程中去运行。
- debuggerControl:用于检测当前是否正在调试中,如果是则不会执行内存泄露检测。
- gcTrigger:当一个被监视的对象预期弱可到达,但是尚未添加到引用队列中时调用。这给应用程序提供了一个hook,以便在再次检查引用队列之前运行GC,以避免在可能的情况下进行 heap dump。
- heapDumper:用于dump heap,然后存储到文件中。
- heapdumpListener:用于分析dump heap后产生的文件。
- heapDumpBuilder:dump heap需要的一些参数信息。
- retainedKeys:用于存储监视对象对应的key。
- queue:用于监听被监视的对象是否已经被垃圾回收器回收。
2.DisplayLeakActivity组件
 LeakCanaryInternals.setEnabledAsync(context, DisplayLeakActivity.class, true);

  public static void setEnabledAsync(Context context, final Class<?> componentClass,
      final boolean enabled) {
    final Context appContext = context.getApplicationContext();
    AsyncTask.THREAD_POOL_EXECUTOR.execute(new Runnable() {
      @Override public void run() {
        setEnabledBlocking(appContext, componentClass, enabled);
      }
    });
  }

  public static void setEnabledBlocking(Context appContext, Class<?> componentClass,
      boolean enabled) {
    ComponentName component = new ComponentName(appContext, componentClass);
    PackageManager packageManager = appContext.getPackageManager();
    int newState = enabled ? COMPONENT_ENABLED_STATE_ENABLED : COMPONENT_ENABLED_STATE_DISABLED;
    // Blocks on IPC.
    packageManager.setComponentEnabledSetting(component, newState, DONT_KILL_APP);
  }
在子线程中去告诉系统不要关闭DisplayLeakActivity组件,DisplayLeakActivity其实就是我们见到的下面这个页面: 
3.开始监视Activity和Fragment对象
      if (watchActivities) {//watchActivities默认为true
        ActivityRefWatcher.install(context, refWatcher);//监视Activity对象
      }
      if (watchFragments) {//watchFragments默认为true
        FragmentRefWatcher.Helper.install(context, refWatcher);//监视Fragment对象
      }
监视Activity对象时,首先用Application对象注册Activity的生命周期回调监听器,然后在Activity的onDestroy方法中调用:
public static void install(@NonNull Context context, @NonNull RefWatcher refWatcher) {
    Application application = (Application) context.getApplicationContext();
    ActivityRefWatcher activityRefWatcher = new ActivityRefWatcher(application, refWatcher);

    application.registerActivityLifecycleCallbacks(activityRefWatcher.lifecycleCallbacks);//注册Activity的生命周期回调监听器
  }

  private final Application.ActivityLifecycleCallbacks lifecycleCallbacks =
      new ActivityLifecycleCallbacksAdapter() {
        @Override public void onActivityDestroyed(Activity activity) {
          refWatcher.watch(activity);//监视 Activity对象
        }
      };
监视Fragment时,首先用Application对象注册Activity的生命周期回调监听器。在Activity的onCreate方法调用时,用FragmentManager对象注册Fragment的生命周期回调监听器。当Fragment的onDestroyView方法调用时,开始监视 Fragment的View对象;在Fragment的onDestroy方法调用时,开始监视 Fragment对象。
注册Fragment的生命周期回调监听器:
 public static void install(Context context, RefWatcher refWatcher) {
      List<FragmentRefWatcher> fragmentRefWatchers = new ArrayList<>();

      if (SDK_INT >= O) {
        fragmentRefWatchers.add(new AndroidOFragmentRefWatcher(refWatcher));
      }

      try {
        Class<?> fragmentRefWatcherClass = Class.forName(SUPPORT_FRAGMENT_REF_WATCHER_CLASS_NAME);
        Constructor<?> constructor =
            fragmentRefWatcherClass.getDeclaredConstructor(RefWatcher.class);
        FragmentRefWatcher supportFragmentRefWatcher =
            (FragmentRefWatcher) constructor.newInstance(refWatcher);
        fragmentRefWatchers.add(supportFragmentRefWatcher);
      } catch (Exception ignored) {
      }

      if (fragmentRefWatchers.size() == 0) {
        return;
      }

      Helper helper = new Helper(fragmentRefWatchers);

      Application application = (Application) context.getApplicationContext();
      application.registerActivityLifecycleCallbacks(helper.activityLifecycleCallbacks);
    }

    private final Application.ActivityLifecycleCallbacks activityLifecycleCallbacks =
        new ActivityLifecycleCallbacksAdapter() {
          @Override public void onActivityCreated(Activity activity, Bundle savedInstanceState) {
            for (FragmentRefWatcher watcher : fragmentRefWatchers) {
              watcher.watchFragments(activity);
            }
          }
        };
这里提供了SupportFragmentRefWatcher或AndroidOFragmentRefWatcher类来监听Fragment的生命周期。SupportFragmentRefWatcher支持support包,AndroidOFragmentRefWatcher支持系统版本O以上。
下面为SupportFragmentRefWatcher类中注册Fragment的生命周期回调监听器:
class SupportFragmentRefWatcher implements FragmentRefWatcher {
  private final RefWatcher refWatcher;

  SupportFragmentRefWatcher(RefWatcher refWatcher) {
    this.refWatcher = refWatcher;
  }

  private final FragmentManager.FragmentLifecycleCallbacks fragmentLifecycleCallbacks =
      new FragmentManager.FragmentLifecycleCallbacks() {

        @Override public void onFragmentViewDestroyed(FragmentManager fm, Fragment fragment) {
          View view = fragment.getView();
          if (view != null) {
            refWatcher.watch(view);//监视 View对象
          }
        }

        @Override public void onFragmentDestroyed(FragmentManager fm, Fragment fragment) {
          refWatcher.watch(fragment);//监视 Fragment对象
        }
      };

  @Override public void watchFragments(Activity activity) {
    if (activity instanceof FragmentActivity) {
      FragmentManager supportFragmentManager =
          ((FragmentActivity) activity).getSupportFragmentManager();
      supportFragmentManager.registerFragmentLifecycleCallbacks(fragmentLifecycleCallbacks, true);
    }
  }
}
在AndroidOFragmentRefWatcher也类似。
开始分析内存泄漏
在开始分析内存泄漏之前,先了解下弱引用(WeakReference)和引用队列( ReferenceQueue):
- 弱引用(WeakReference):弱引用对象,它们并不禁止其指示对象变得可终结,并被终结,然后被回收。弱引用最常用于实现规范化的映射。
- 引用队列( ReferenceQueue):引用队列,在检测到适当的可到达性更改后,垃圾回收器将已注册的引用对象添加到该队列中。
创建一个弱引用对象:
public class WeakReference<T> extends Reference<T> {

    //创建引用给定对象的新的弱引用。
    public WeakReference(T referent) {
        super(referent);
    }

  //创建引用给定对象的新的弱引用,并向给定队列注册该引用。
    public WeakReference(T referent, ReferenceQueue<? super T> q) {
        super(referent, q);
    }

}
当Activity或者Fragment在调用onDestroy方法时,就会开始分析Activity或者Fragment对象是否会存在内存泄漏。
内存泄漏分析从RefWatcher类的watch方法开始:
  /**
   * Watches the provided references and checks if it can be GCed. This method is non blocking,
   * the check is done on the {@link WatchExecutor} this {@link RefWatcher} has been constructed
   * with.
   *
   * @param referenceName An logical identifier for the watched object.
   */
  public void watch(Object watchedReference, String referenceName) {
    if (this == DISABLED) {
      return;
    }
    checkNotNull(watchedReference, "watchedReference");
    checkNotNull(referenceName, "referenceName");
    final long watchStartNanoTime = System.nanoTime();
    String key = UUID.randomUUID().toString();//生成一个唯一的key,用于查找KeyedWeakReference
    retainedKeys.add(key);//缓存key
    final KeyedWeakReference reference =
        new KeyedWeakReference(watchedReference, key, referenceName, queue);//包装对象成弱引用,然后添加到ReferenceQueue中

    ensureGoneAsync(watchStartNanoTime, reference);//放到后台线程中去执行
  }

  // 延迟指定的时间后发送到后台线程中去运行
    private void ensureGoneAsync(final long watchStartNanoTime, final KeyedWeakReference reference) {
    watchExecutor.execute(new Retryable() {
      @Override public Retryable.Result run() {
        return ensureGone(reference, watchStartNanoTime);//放到后台线程中去运行
      }
    });
  }

  @SuppressWarnings("ReferenceEquality") // Explicitly checking for named null.
  Retryable.Result ensureGone(final KeyedWeakReference reference, final long watchStartNanoTime) {
    long gcStartNanoTime = System.nanoTime();
    long watchDurationMs = NANOSECONDS.toMillis(gcStartNanoTime - watchStartNanoTime);

    removeWeaklyReachableReferences();//移除弱可达的引用对象

    if (debuggerControl.isDebuggerAttached()) {
      // The debugger can create false leaks.
      return RETRY;
    }
    if (gone(reference)) {//检查对象是否从引用队列中移除了,如果是就没有内存泄漏,正常结束,否则继续往下执行
      return DONE;
    }
    gcTrigger.runGc();////如果对象没有被垃圾回收,就手动触发gc
    removeWeaklyReachableReferences();//再次移除弱可达的引用对象
    if (!gone(reference)) {//再次检查对象是否从引用队列中移除了,如果是就没有内存泄漏,正常结束,否则继续往下执行,开始dump heap
      long startDumpHeap = System.nanoTime();
      long gcDurationMs = NANOSECONDS.toMillis(startDumpHeap - gcStartNanoTime);

      File heapDumpFile = heapDumper.dumpHeap();
      if (heapDumpFile == RETRY_LATER) {
        // Could not dump the heap.
        return RETRY;
      }
      long heapDumpDurationMs = NANOSECONDS.toMillis(System.nanoTime() - startDumpHeap);

      HeapDump heapDump = heapDumpBuilder.heapDumpFile(heapDumpFile).referenceKey(reference.key)
          .referenceName(reference.name)
          .watchDurationMs(watchDurationMs)
          .gcDurationMs(gcDurationMs)
          .heapDumpDurationMs(heapDumpDurationMs)
          .build();

      heapdumpListener.analyze(heapDump);
    }
    return DONE;
  }
从上面看到,调用关系依次是:
- RefWatcher → watch → ensureGoneAsync → (AndroidWatchExecutor → execute) → ensureGone →
- ServiceHeapDumpListener → analyze →
- HeapAnalyzerService → runAnalysis → onHandleIntentInForeground →
- AbstractAnalysisResultService → sendResultToListener → onHandleIntentInForeground → (DisplayLeakService) → onHeapAnalyzed → showNotification
- LeakCanaryInternals → showNotification → DisplayLeakActivity
第一步
首先将对象包装成KeyedWeakReference,然后等待主线程空闲时,再延迟一个指定的时间发送到后台线程中运行。接下来是移除弱可达的对象:
 private void removeWeaklyReachableReferences() {
    // WeakReferences are enqueued as soon as the object to which they point to becomes weakly
    // reachable. This is before finalization or garbage collection has actually happened.
    KeyedWeakReference ref;
    while ((ref = (KeyedWeakReference) queue.poll()) != null) {//从队列中移除引用对象
      retainedKeys.remove(ref.key);
    }
  }
引用队列的poll()方法的意思是:轮询此队列,查看是否存在可用的引用对象。如果存在一个立即可用的对象,则从该队列中移除此对象并返回。否则此方法立即返回 null。
其次,再检查当前监视的对象是否从引用队列中移除了,如果是就代表没有内存泄漏,停止运行;否则继续向下运行,开始手动gc:
gcTrigger.runGc();

public void runGc() {
      Runtime.getRuntime().gc();
      enqueueReferences();
      System.runFinalization();
    }
当手动gc完成后,又重新移除弱可达的对象,检查当前监视的对象是否从引用队列中移除。如果对象还没有移除,就开始dump heap进行分析。
第二步
在dump heap之前,还要先做一些准备工作,创建存储文件,以及要分析的内存泄漏对象的基本信息。接下来调用heapdumpListener的analyze方法开始分析:
heapdumpListener.analyze(heapDump);
heapdumpListener就是在LeakCanary的install方法中listenerServiceClass(DisplayLeakService.class)赋的值:
 public @NonNull AndroidRefWatcherBuilder listenerServiceClass(
      @NonNull Class<? extends AbstractAnalysisResultService> listenerServiceClass) {
    return heapDumpListener(new ServiceHeapDumpListener(context, listenerServiceClass));
  }
接下调用ServiceHeapDumpListener类的analyze方法:
@Override public void analyze(@NonNull HeapDump heapDump) {
    checkNotNull(heapDump, "heapDump");
    HeapAnalyzerService.runAnalysis(context, heapDump, listenerServiceClass);
  }
在analyze方法中又交给HeapAnalyzerService类的runAnalysis方法:
 public static void runAnalysis(Context context, HeapDump heapDump,
      Class<? extends AbstractAnalysisResultService> listenerServiceClass) {
    setEnabledBlocking(context, HeapAnalyzerService.class, true);
    setEnabledBlocking(context, listenerServiceClass, true);
    Intent intent = new Intent(context, HeapAnalyzerService.class);
    intent.putExtra(LISTENER_CLASS_EXTRA, listenerServiceClass.getName());
    intent.putExtra(HEAPDUMP_EXTRA, heapDump);
    ContextCompat.startForegroundService(context, intent);
  }
HeapAnalyzerService是一个IntentService,所以此时运行在后台服务中,接下来调用HeapAnalyzerService的是onHandleIntentInForeground方法:
 @Override protected void onHandleIntentInForeground(@Nullable Intent intent) {
    if (intent == null) {
      CanaryLog.d("HeapAnalyzerService received a null intent, ignoring.");
      return;
    }
    String listenerClassName = intent.getStringExtra(LISTENER_CLASS_EXTRA);
    HeapDump heapDump = (HeapDump) intent.getSerializableExtra(HEAPDUMP_EXTRA);

    HeapAnalyzer heapAnalyzer =
        new HeapAnalyzer(heapDump.excludedRefs, this, heapDump.reachabilityInspectorClasses);

    AnalysisResult result = heapAnalyzer.checkForLeak(heapDump.heapDumpFile, heapDump.referenceKey,
        heapDump.computeRetainedHeapSize);
    AbstractAnalysisResultService.sendResultToListener(this, listenerClassName, heapDump, result);
  }
在这个方法中,调用HeapAnalyzer的checkForLeak方法开始分析内存泄漏:
  /**
 1. Searches the heap dump for a {@link KeyedWeakReference} instance with the corresponding key,
 2. and then computes the shortest strong reference path from that instance to the GC roots.
   */
  public @NonNull AnalysisResult checkForLeak(@NonNull File heapDumpFile,
      @NonNull String referenceKey,
      boolean computeRetainedSize) {
    long analysisStartNanoTime = System.nanoTime();

    if (!heapDumpFile.exists()) {
      Exception exception = new IllegalArgumentException("File does not exist: " + heapDumpFile);
      return failure(exception, since(analysisStartNanoTime));
    }

    try {
      listener.onProgressUpdate(READING_HEAP_DUMP_FILE);
      HprofBuffer buffer = new MemoryMappedFileBuffer(heapDumpFile);
      HprofParser parser = new HprofParser(buffer);
      listener.onProgressUpdate(PARSING_HEAP_DUMP);
      Snapshot snapshot = parser.parse();
      listener.onProgressUpdate(DEDUPLICATING_GC_ROOTS);
      deduplicateGcRoots(snapshot);
      listener.onProgressUpdate(FINDING_LEAKING_REF);
      Instance leakingRef = findLeakingReference(referenceKey, snapshot);

      // False alarm, weak reference was cleared in between key check and heap dump.
      if (leakingRef == null) {
        return noLeak(since(analysisStartNanoTime));
      }
      return findLeakTrace(analysisStartNanoTime, snapshot, leakingRef, computeRetainedSize);
    } catch (Throwable e) {
      return failure(e, since(analysisStartNanoTime));
    }
  }
HeapAnalyzer就是最开始说的:
- HeapAnalyzer使用HAHA来解析dump heap。
- HeapAnalyzer 通过唯一的引用key来找到heap dump 中的KeyedWeakReference,并定位内存泄漏引用。
- HeapAnalyzer计算到GC Roots的最短强引用链路径来确定是否有泄漏,然后构建导致泄漏的引用链。
分析完成之后,将分析结果封装成AnalysisResult对象。最后交给AbstractAnalysisResultService的子类DisplayLeakService来处理结果,DisplayLeakService主要用来显示通知,展示在用户面前。就此,内存泄漏分析完成。
总结
LeakCanary用到的最主要的知识点就是垃圾回收器的可达性分析算法:当一个对象到GC Roots 没有任何引用链相连时,则证明此对象是不可用的。
要明白LeakCanary的内存泄漏检测原理,需要了解掌握:
- Activity和Fragment的生命周期回调
- 弱引用和引用队列
- 垃圾回收算法:可达性分析算法
总之,LeakCanary是一个非常实用的检测App中内存泄漏的工具,我们可以通过它来避免内存泄漏,让应用程序更加的完美。
文档信息
- 本文作者:Wang Jiang
- 本文链接:https://wjrye.github.io/2018/11/13/LeakCananry-Inro/
- 版权声明:自由转载-非商用-非衍生-保持署名(创意共享3.0许可证)